How to install Paymenter on a VPS with Coolify and Docker (step by step)
This article contains affiliate links, marked “affiliate”. If you sign up through them, codigoagente may earn a commission at no extra cost to you.
A step-by-step guide to running Paymenter in production on a Contabo VPS with Coolify and Docker: server, domain, HTTPS, database, cron, backups and upgrades, with the exact commands. In the previous deep dive we looked at what Paymenter is and how it works internally; here we deploy it with MariaDB and Redis, served over HTTPS on your own domain.
By the end you will have this architecture:
- Contabo Cloud VPS running Ubuntu 24.04 LTS (22.04 works too).
- Coolify, which installs Docker Engine and Docker Compose and runs Traefik as a reverse proxy with automatic Let's Encrypt certificates.
- Paymenter (PHP-FPM + Nginx + queue worker + cron in a single container), MariaDB 11.8 and Redis, deployed from Coolify's official template.
Compared with a hand-written docker-compose.yml, Coolify generates the passwords, manages the proxy and certificates, gives you logs, a terminal and scheduled backups from the browser, and upgrading Paymenter becomes changing an image tag and redeploying.
The guide is split into six parts. Follow them in order or jump to the one you need:
- Contabo: what it is, pricing and which plan to pick.
- Preparing the server: DNS, updates, firewall, Coolify and HTTPS for the panel.
- Deploying Paymenter: template, domain, initialisation, proxies and cron.
- Running it in production: email, backups and upgrades.
- Real errors and how to fix them: the ten problems we hit and their fixes.
- Do it with Claude: what to have connected and the prompt to have Claude deploy it with you.
Part 1: Contabo, the VPS
What is Contabo?
Contabo is a German infrastructure provider founded in 2003 in Munich. Its pitch is simple: lots of CPU, RAM and disk per euro, in exchange for a plainer control panel and fewer managed services than the big clouds. That is why it is so popular for self-hosting tools like Coolify, game panels or, as here, a billing system.
What it offers:
- Cloud VPS: virtual machines on shared resources, the product we will use.
- Cloud VDS: virtual servers with dedicated physical cores, for sustained CPU workloads.
- Dedicated servers (bare metal).
- S3-compatible Object Storage, handy for keeping database backups off the VPS.
- Add-ons such as snapshots, auto backup, extra IPs, Windows Server licences, cPanel or Plesk.
It has data centres in the European Union, the United Kingdom, the United States, Singapore, Japan, India and Australia. If your customers are in Latin America, a US region usually gives better latency than Europe.
Cloud VPS pricing
Prices published on contabo.comaffiliate as of 13 October 2026. Contabo shows them as the effective monthly rate for a 24-month term, taxes included; shorter terms cost more per month (the page itself shows the higher reference price next to each plan). Always confirm the total at checkout.
| Plan | vCPU | RAM | Disk | Snapshots | Port | Price/month (24 months) |
|---|---|---|---|---|---|---|
| Cloud VPS 4 | 4 | 8 GB | 100 GB SSD | 1 | 200 Mbit/s | €4.40 |
| Cloud VPS 6 | 6 | 12 GB | 200 GB SSD or 100 GB NVMe | 2 | 300 Mbit/s | €6.00 |
| Cloud VPS 8 | 8 | 24 GB | 300 GB SSD or 150 GB NVMe | 3 | 600 Mbit/s | €11.20 |
| Cloud VPS 12 | 12 | 48 GB | 400 GB SSD or 200 GB NVMe | 3 | 800 Mbit/s | €20.00 |
| Cloud VPS 16 | 16 | 64 GB | 500 GB SSD or 250 GB NVMe | 3 | 1 Gbit/s | €29.60 |
| Cloud VPS 18 | 18 | 96 GB | 600 GB SSD or 300 GB NVMe | 3 | 1 Gbit/s | €39.20 |
Terms worth knowing:
- Traffic: unlimited inbound; unlimited outbound under a fair-use policy, and Contabo may throttle servers with very high usage.
- Contract: 1 month minimum, renewing for the same term. No cancellation notice on prepaid; 4 weeks on postpaid.
- Scaling: you can upgrade the plan from the control panel without reinstalling.
- Payment: with methods other than a card, the first payment is made manually after ordering, and the server is not delivered until it clears.
Which plan to pick
Coolify needs at least 2 cores, 2 GB of RAM and 10 GB free. Paymenter, MariaDB and Redis use little with a normal customer base. The Cloud VPS 4 (4 vCPU, 8 GB) is more than enough for this guide and leaves room to host more services on the same Coolify. If you will bill many customers or share the server with more applications, the NVMe option on the Cloud VPS 6 noticeably improves database I/O.
If you don't have a VPS yet, you can get an affordable one at Contaboaffiliate.
Part 2: preparing the server
Requirements
- A freshly installed VPS with Ubuntu 24.04 LTS or 22.04 LTS and root SSH access.
- A domain whose DNS you can edit. We will use
coolify.yourdomain.comfor the panel andbilling.yourdomain.comfor Paymenter. - About 30 minutes.
Step 1: order the VPS
In the order form choose the region, the Ubuntu 24.04 image and set the root password (or, better, paste your public SSH key). Contabo emails the IP when the server is ready; you will also see it in the customer panel.
Step 2: point the domain at the server
At your DNS provider create two A records for the VPS IP (replace 203.0.113.10 with yours):
coolify.yourdomain.com   A   203.0.113.10
billing.yourdomain.com   A   203.0.113.10
A wildcard *.yourdomain.com also works and saves records for future services. If you use Cloudflare, keep the records as DNS only (grey cloud) until Coolify has issued the certificates.
Watch out if your domain already has a wildcard pointing somewhere else (your registrar's parking page, for example, or a proxied wildcard). It happened in our real deployment: billing resolved to a different IP and Let's Encrypt could not validate. A specific A record always takes priority over the wildcard, so creating the billing record as DNS only is enough.
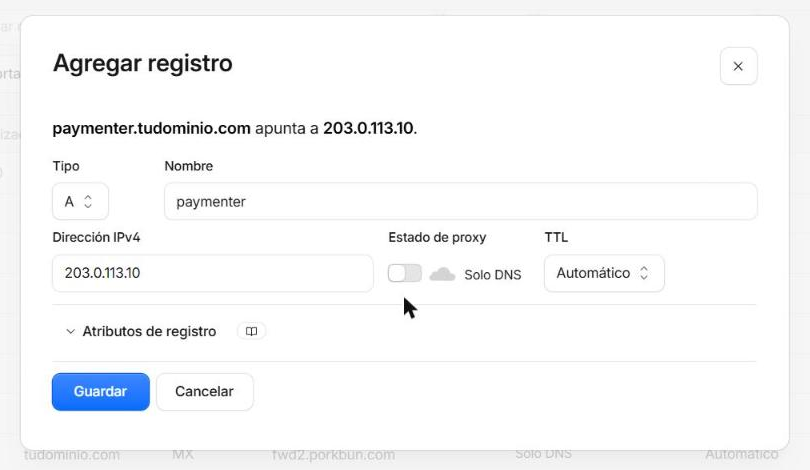
Check propagation from your machine:
dig +short billing.yourdomain.comStep 3: first login and updates
Connect and update the system:
ssh root@203.0.113.10

apt update && apt upgrade -y
apt install -y curl ufw
timedatectl set-timezone America/Guayaquil   # use your timezone (host logs and cron)
reboot
The host timezone only affects system logs and tasks. Paymenter uses its own, which we will set in the panel (UTC by default).
Next, enable the firewall. Coolify needs SSH and HTTP/HTTPS. While you reach the panel by IP it also needs port 8000 and ports 6001 and 6002, used by real-time notifications and the web terminal:
ufw allow 22/tcp
ufw allow 80/tcp
ufw allow 443/tcp
ufw allow 8000/tcp
ufw allow 6001/tcp
ufw allow 6002/tcp
ufw enable
ufw status
Keep in mind that Docker writes its own iptables rules, and ports published by a container are reachable even if UFW does not allow them. That is why no service in this guide publishes ports: all traffic enters through Traefik on 80/443.
Step 4: install Coolify (and Docker)
The official installer sets up Docker Engine, the Docker Compose plugin and Coolify under /data/coolify:
curl -fsSL https://cdn.coollabs.io/coolify/install.sh | sudo bashWhen it finishes, verify:
docker version --format '{{.Server.Version}}'
docker compose version
docker ps --format 'table {{.Names}}\t{{.Status}}'
You should see the coolify, coolify-db, coolify-redis, coolify-realtime and coolify-proxy containers.
Open http://203.0.113.10:8000 and create the admin account right away: whoever reaches that screen first owns the instance. Also keep a copy of /data/coolify/source/.env, which holds Coolify's APP_KEY and other secrets.
Step 5: domain and HTTPS for the Coolify panel
In Settings → General, fill in Instance's Domain with https://coolify.yourdomain.com and save. Traefik will request the Let's Encrypt certificate within seconds. With the domain set, Traefik also routes real-time and the web terminal, so once the panel loads over HTTPS you can close the temporary ports:
ufw delete allow 8000/tcp
ufw delete allow 6001/tcp
ufw delete allow 6002/tcp
Over HTTPS, Traefik routes /app to coolify-realtime:6001 and /terminal/ws to coolify-realtime:6002. If the web terminal shows "Could not connect to the terminal server" or "websocket connection lost", those two routes are missing. It happened in our real deployment: the proxy had a custom coolify-dashboard.toml file that only routed the panel.
The fix is to add the routes in a new file. Coolify 4.4.6 validates dynamic configurations as YAML, so an existing .toml cannot be edited from the UI: create a separate YAML one. Go to Servers → localhost → Proxy → Dynamic Configurations → + Add, name it coolify-realtime.yaml and paste this (replace the domain with yours):
http:
  routers:
    coolify-realtime-ws:
      entryPoints:
        - https
      rule: "Host(`coolify.yourdomain.com`) && PathPrefix(`/app`)"
      service: coolify-realtime-ws
      tls:
        certResolver: letsencrypt
    coolify-terminal-ws:
      entryPoints:
        - https
      rule: "Host(`coolify.yourdomain.com`) && PathPrefix(`/terminal/ws`)"
      service: coolify-terminal-ws
      tls:
        certResolver: letsencrypt
  services:
    coolify-realtime-ws:
      loadBalancer:
        servers:
          - url: "http://coolify-realtime:6001"
    coolify-terminal-ws:
      loadBalancer:
        servers:
          - url: "http://coolify-realtime:6002"
Save it. Traefik reloads dynamic configurations by itself, without restarting the proxy, and the terminal connects right away.
Part 3: deploying Paymenter
Step 6: create the service from the template
Coolify ships an official Paymenter template. Under Projects click + New Project, give it a name (for example billing) and Coolify creates the production environment. Inside the environment click + New Resource, type paymenter in the search box and click Deploy on its card. Despite the name, that button only creates the service; nothing starts yet. With a single server, Coolify doesn't ask where to deploy.
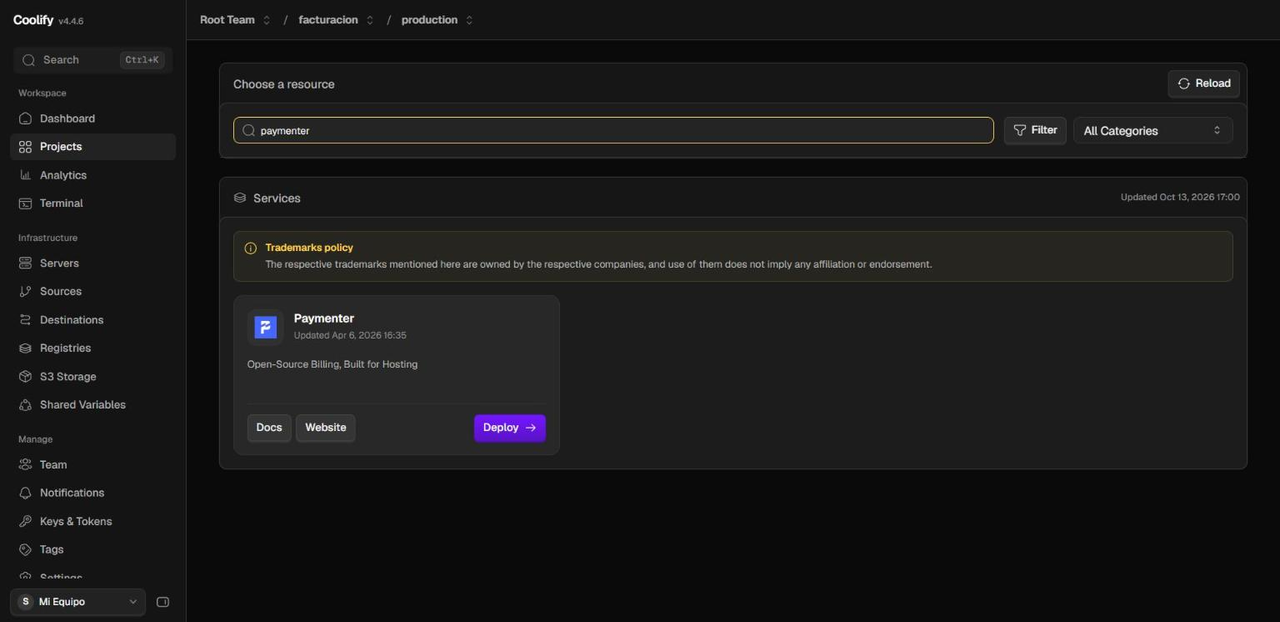
This is the template Coolify loads (abridged):
services:
  paymenter:
    image: 'ghcr.io/paymenter/paymenter:v1.4.5'
    volumes:
      - 'app_logs:/app/storage/logs'
      - 'extenstions:/app/extensions'
      - 'themes:/app/themes'
      - 'app_storage:/app/storage/app'
      - 'app_public_storage:/app/storage/app/public'
    environment:
      SERVICE_URL_PAYMENTER: '${SERVICE_URL_PAYMENTER_80}'
      DB_DATABASE: '${MYSQL_DATABASE:-paymenter-db}'
      DB_PASSWORD: '${SERVICE_PASSWORD_MYSQL}'
      DB_USERNAME: '${SERVICE_USER_MYSQL}'
      APP_ENV: production
      CACHE_STORE: redis
      SESSION_DRIVER: redis
      QUEUE_CONNECTION: redis
      REDIS_HOST: redis
      REDIS_USERNAME: default
      REDIS_PASSWORD: '${SERVICE_PASSWORD_64_REDIS}'
      DB_CONNECTION: mariadb
      DB_HOST: mariadb
      DB_PORT: 3306
      APP_KEY: '${SERVICE_BASE64_KEY}'
    depends_on:
      mariadb:
        condition: service_healthy
      redis:
        condition: service_started
  mariadb:
    image: 'mariadb:11.8'
    volumes:
      - 'paymenter_mariadb_data:/var/lib/mysql'
    environment:
      - 'MYSQL_ROOT_PASSWORD=${SERVICE_PASSWORD_MYSQLROOT}'
      - 'MYSQL_DATABASE=${MYSQL_DATABASE:-paymenter-db}'
      - 'MYSQL_USER=${SERVICE_USER_MYSQL}'
      - 'MYSQL_PASSWORD=${SERVICE_PASSWORD_MYSQL}'
  redis:
    image: 'redis:alpine'
What matters in this file:
- The
SERVICE_PASSWORD_*,SERVICE_USER_*andSERVICE_BASE64_KEYvariables are magic: Coolify generates a random value for each one when the service is created and stores it encrypted. You don't invent passwords or leave them in any file; you can see them in the Environment Variables tab if you need them. SERVICE_URL_PAYMENTER_80tells Coolify the container listens on port 80 and that the domain you configure must be routed to it through Traefik.APP_KEYis the key Laravel uses to encrypt sensitive data (for example, payment gateway credentials). If you lose it or it changes, that data becomes unreadable: include it in your backup plan.- There is no
ports:. No container is exposed directly to the internet.
Image version. In Coolify 4.4.6 the template pins v1.4.5, but the latest stable Paymenter release is v1.5.9. Click Edit Compose File and change the line to image: 'ghcr.io/paymenter/paymenter:v1.5.9' before the first deploy. Avoid latest: with a fixed tag you know exactly what runs in production and you decide when to upgrade.
Step 7: domain and deploy
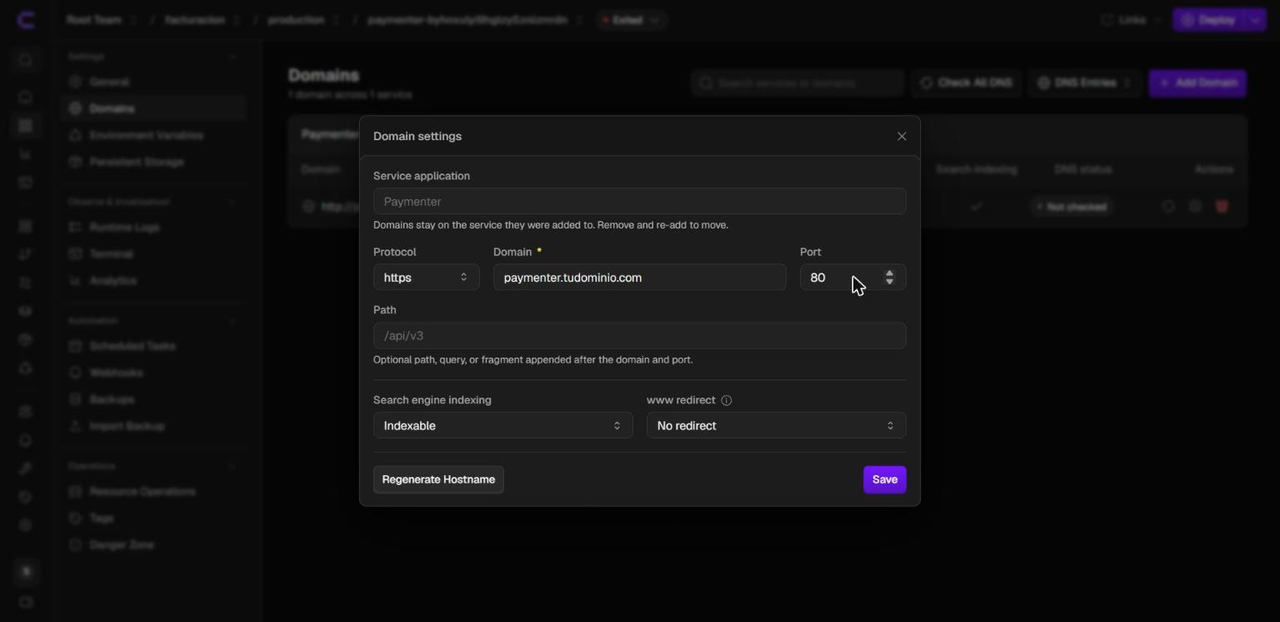
In the service's side menu open Domains and click the gear on the paymenter container. In the Domain settings dialog pick the https protocol, enter billing.yourdomain.com and leave port 80. If Coolify asks "Use a different port?", click Use This Port Anyway: 80 is the container's internal port, not one published on the host. Save and click Deploy.
The General tab shows the database user in plain text. Keep it out of screenshots.
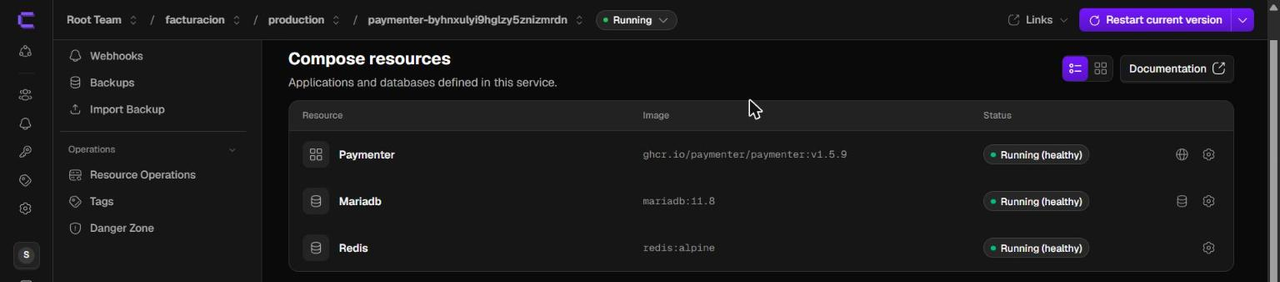
On first boot, the image entrypoint waits for MariaDB to respond, creates the storage link, copies the default themes and extensions, runs php artisan migrate --seed --force and starts supervisord, which keeps PHP-FPM, Nginx and the queue worker (queue:work) alive, plus crond for the Laravel scheduler. Coolify opens the Service Startup modal with the image pull log. Once all three containers show Running (healthy) and the domain says DNS matches, the service is ready. From then on the Deploy button is called Restart current version.
Step 8: initialise Paymenter
What is left is registering the company name, the public URL and the first administrator. In Coolify open Terminal in the service menu, click Start a terminal session and pick the paymenter container. Run these three commands, one at a time:
php artisan app:init
php artisan db:seed --class=CustomPropertySeeder --force
php artisan app:user:create
What each one does and asks:
app:initasks for the company name and the public URL, which must start withhttps://(for examplehttps://billing.yourdomain.com). It stores them ascompany_nameandapp_url. If you get it wrong, run it again: it overwrites both values.db:seed --class=CustomPropertySeedercreates the customer billing fields (phone, company, address, city, state, ZIP and country).app:user:createasks for first name, last name, email, password and role. Pick admin, which the seeder creates with*permissions.
Type only the answer to each question. A common mistake is pasting the explanation line or the next command as an answer: Paymenter accepts it as text and you end up with a company called "php artisan…". If that happens, run app:init again or fix the user's name under Admin → Users.
If you prefer SSH, find the container from the VPS and prefix each command with docker exec -it:
PAYMENTER=$(docker ps --filter 'name=^paymenter-' --format '{{.Names}}' | head -n1)
docker exec -it "$PAYMENTER" php artisan app:init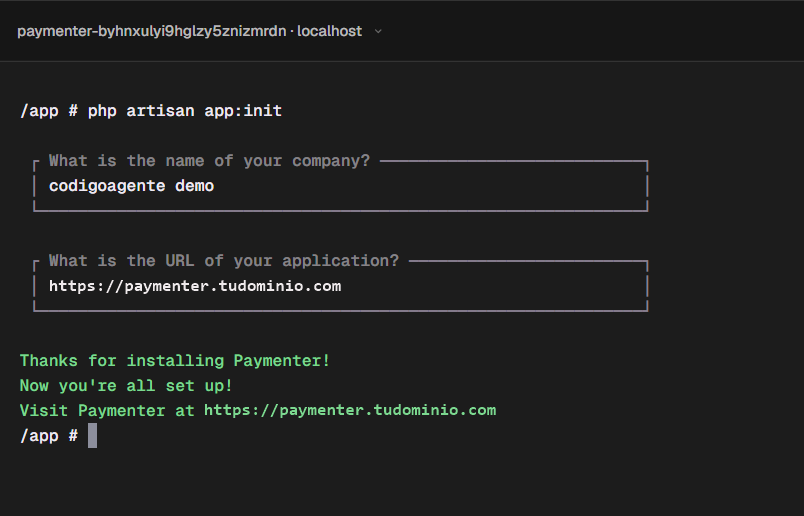
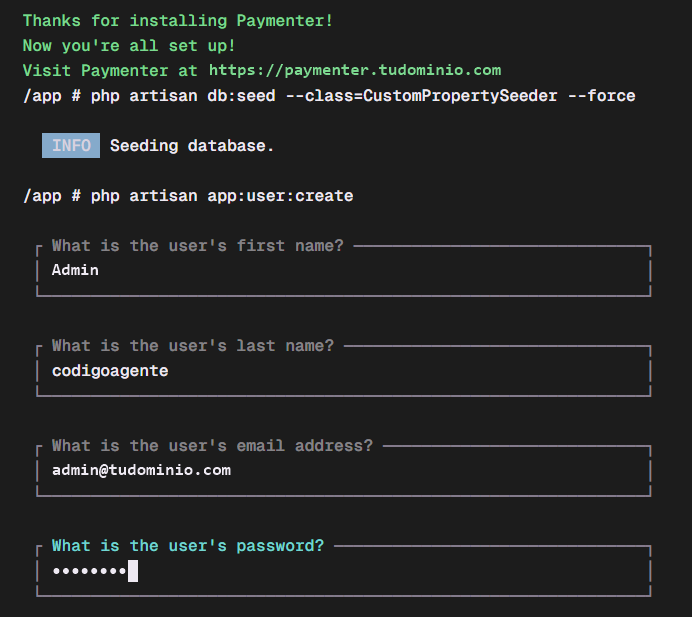
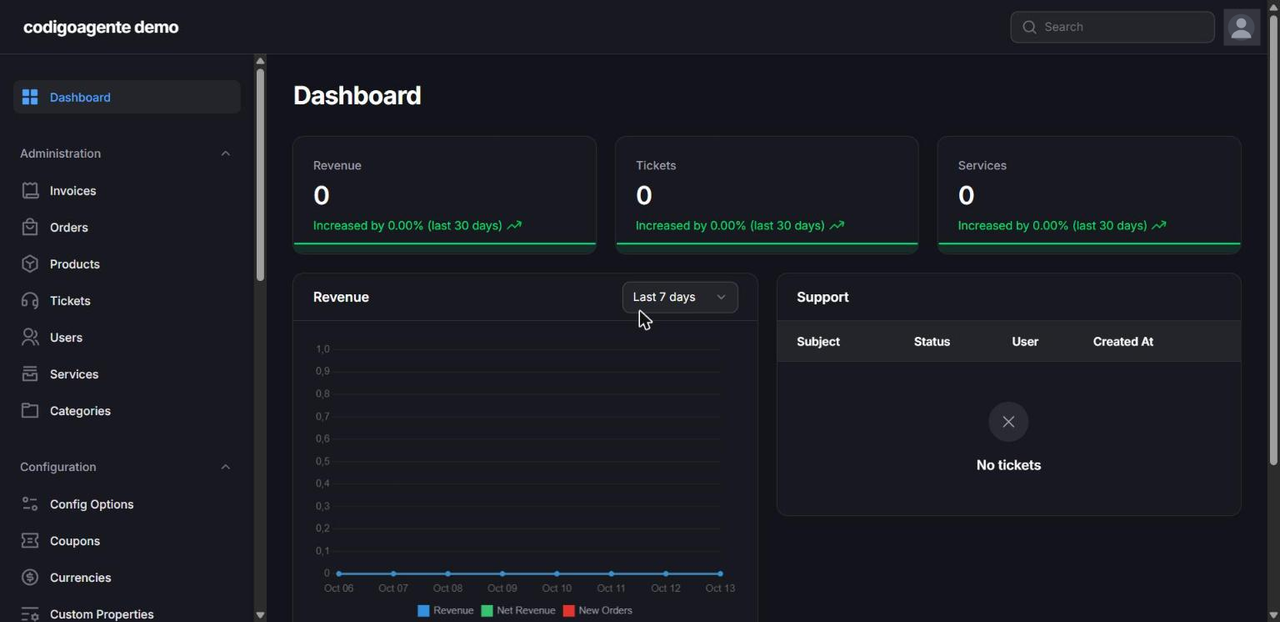
Now open https://billing.yourdomain.com, sign in with the user you just created and go to the panel at /admin.
Step 9: trusted proxies
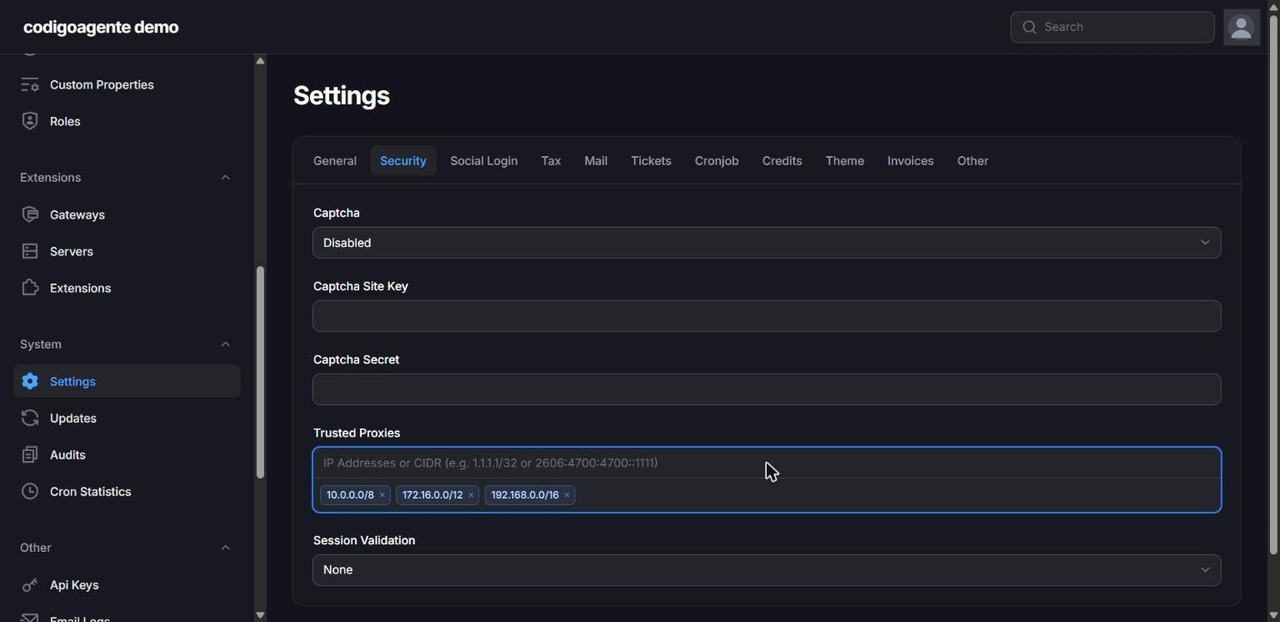
Paymenter sits behind Traefik, so every request reaches it from the proxy's IP. Unless you tell it to trust the proxy, Laravel ignores the X-Forwarded-* headers: it generates http:// links, the browser blocks assets as mixed content and file uploads fail.
Find the proxy network:
docker inspect coolify-proxy \
  --format '{{range $k, $v := .NetworkSettings.Networks}}{{$k}} {{$v.IPAddress}}{{"\n"}}{{end}}'

# Subnet of the Paymenter service network
docker network inspect $(docker inspect "$PAYMENTER" --format '{{range $k, $v := .NetworkSettings.Networks}}{{$k}} {{end}}' | awk '{print $1}') \
  --format '{{range .IPAM.Config}}{{.Subnet}}{{end}}'
In Paymenter go to Admin → Settings → Security → Trusted proxies and add the proxy's IP on the Paymenter network, or the whole subnet (for example 10.0.1.0/24). A practical alternative, and the one we used, is the three private ranges: 10.0.0.0/8, 172.16.0.0/12 and 192.168.0.0/16. They cover any Docker network and are safe because the container publishes no ports: only Traefik can reach it. Paymenter also accepts *, though being explicit is better.
Before saving, fill in System Email Address under Settings → General. Paymenter validates the whole settings page and, with that field empty, won't save the proxies.
Step 10: check cron and queues
The Laravel scheduler runs a heartbeat every minute, the daily CronJob that generates invoices, sends reminders and suspends or terminates services, and the ticket email import every five minutes. Check it:
docker exec -it "$PAYMENTER" php artisan schedule:list
docker exec -it "$PAYMENTER" supervisorctl -c /etc/supervisord.conf status
You should see php-fpm, nginx and queue-worker as RUNNING. The daily cron time is set under Admin → Settings → Cronjob (00:00 by default) and is read in the timezone from Admin → Settings → General, which defaults to UTC: set it to your business timezone.
Part 4: running it in production
Outgoing email
Without SMTP Paymenter cannot send invoices or password resets. Configure it under Admin → Settings → Mail with a transactional provider (Amazon SES, Postmark, Brevo, etc.) and set up SPF, DKIM and DMARC on your domain. Many VPS providers block or rate-limit port 25; use 587 with STARTTLS.
Backups
A billing system without backups is a debt about to be collected. Two layers:
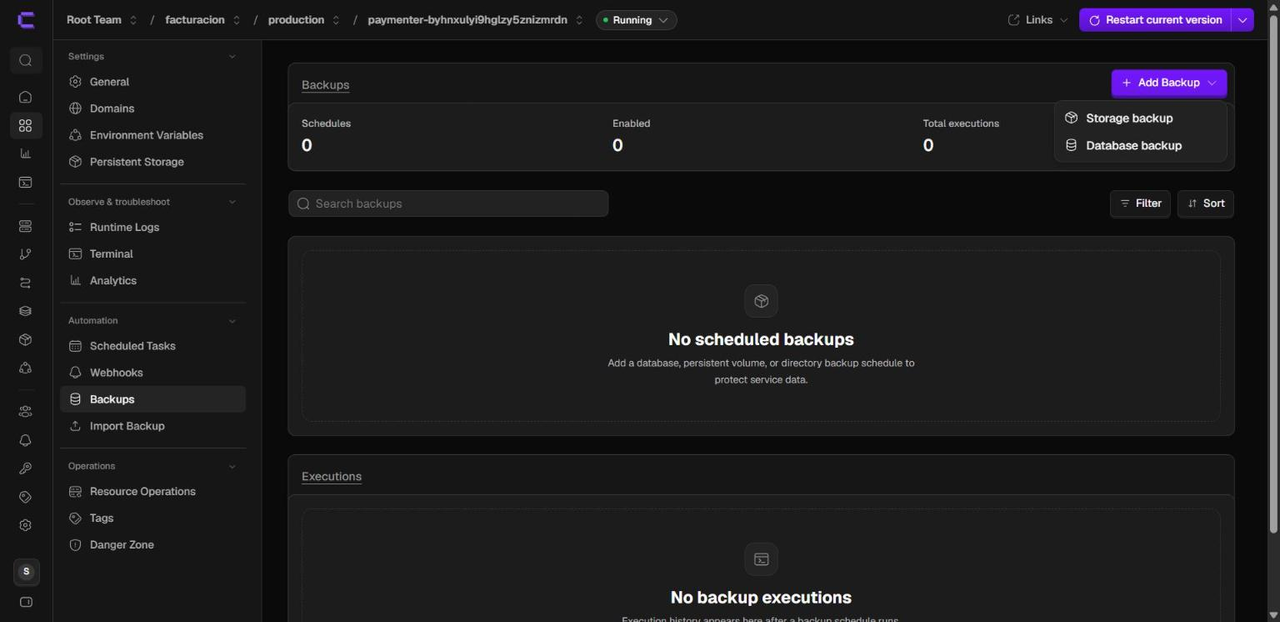
- Database: in the service's side menu open Automation, click + Add Backup, choose Database backup on
mariadband schedule it daily (for example0 3 * * *). Under Settings → S3 Storages you can add an S3 bucket, Contabo Object Storage included, so the copies leave the VPS. - Whole server: take a Contabo snapshot before every significant upgrade.
And keep the service's APP_KEY and Coolify's .env off the server.
Upgrading Paymenter
Read the release notes, take a backup, change the image tag in Edit Compose File (for example from v1.5.9 to the next one) and click Redeploy. Migrations apply automatically because the entrypoint runs migrate --force on every start.
One warning: on every start the image also restores the default themes and extensions. If you modified the default theme instead of creating your own, add PAYMENTER_SKIP_DEFAULT=true to the environment variables or you will lose your changes.
Part 5: real errors and how to fix them
These are the problems we actually hit while deploying this guide, in the order they showed up. Each one has the symptom you will see, the cause and the fix.
Error 1: the subdomain resolves, but not to your VPS
Symptom: Coolify doesn't issue the certificate and the browser shows a security warning or another service's page.
Cause: the domain had a wildcard *.yourdomain.com pointing elsewhere (in our case, the registrar's parking page behind Cloudflare's orange-cloud proxy). The subdomain "existed", but it returned Cloudflare's IPs instead of the VPS's, so Let's Encrypt couldn't validate.
Fix: create a specific A record (billing → VPS IP) set to DNS only (grey cloud). A specific record always beats the wildcard. Check it like this:
dig +short billing.yourdomain.comOn Windows use Resolve-DnsName billing.yourdomain.com. It must return your VPS IP, and in Coolify the domain must show DNS matches.
Error 2: the template installs an old version
Symptom: after deploying, the panel shows a Paymenter version older than the latest release.
Cause: the Coolify 4.4.6 template pins v1.4.5.
Fix: before the first Deploy, open Edit Compose File and change the image to ghcr.io/paymenter/paymenter:v1.5.9 (step 6).
Error 3: the "Use a different port?" warning
Symptom: when saving the domain with port 80, Coolify asks whether you want a different port.
Cause: it's a generic UI warning. Port 80 is the container's internal port, not one published on the server.
Fix: click Use This Port Anyway.
Error 4: Coolify's web terminal won't connect
Symptom: "Could not connect to the terminal server" or "Terminal websocket connection lost".
Cause: the proxy had a custom route that only sent the panel to coolify:8080, without the websocket routes. If https://coolify.yourdomain.com/terminal/ws returns a 404 from the panel, this is your case.
Fix: create the coolify-realtime.yaml file from step 5 with the /app → coolify-realtime:6001 and /terminal/ws → coolify-realtime:6002 routes. No proxy restart needed.
Error 5: "Unable to parse at line 2" when editing the proxy
Symptom: you try to edit a .toml file under Dynamic Configurations and Coolify won't save it.
Cause: Coolify validates every dynamic file as YAML, even the ones ending in .toml.
Fix: don't edit the .toml; create a separate .yaml file with the new routes.
Error 6: you can't get in over SSH or VNC
Symptom: ssh root@IP doesn't respond and Contabo's VNC client says "Failed to connect to server".
Cause: on our VPS port 22 didn't answer from outside because of the firewall, and VNC was turned off in the Contabo panel.
Fix: you don't need SSH for anything in this guide: Coolify's web terminal (once fixed as in error 4) lets you run the commands inside the container. If you need the console, enable VNC in the Contabo panel (in the VPS management page, VNC section, with an 8-character password) and check the firewall rules for port 22.
Error 7: the company or your name are wrong
Symptom: the company is called "# Company name…" or your username is "php artisan schedule:list".
Cause: app:init and app:user:create ask in interactive boxes and store exactly what you paste. If you copy a whole line from the guide, or the next command, that becomes the answer.
Fix: answer only the value being asked for. app:init can be re-run and overwrites the name and URL. The user's name is fixed under Admin → Users → Edit.
Error 8: "The system Email Address field is required"
Symptom: you can't save any change under Settings, for example the trusted proxies.
Cause: Paymenter validates the whole settings page and the system email is empty.
Fix: fill in Settings → General → System Email Address first.
Error 9: the browser fills in the mail password for you
Symptom: when saving Settings, the Mail Password field holds a password you didn't type.
Cause: Chrome autofills the field with the password saved for that site.
Fix: check that field before saving and clear it if you haven't set up SMTP yet.
Error 10: no email goes out
Symptom: no invoices, no reminders, no password reset links.
Cause: Paymenter ships with Disable Mail turned on.
Fix: configure SMTP under Settings → Mail and turn off Disable Mail (Part 4). If it still doesn't send, check the log in storage/logs (the app_logs volume).
Other common errors
- "No available server" or a Traefik 502: Paymenter's healthcheck isn't passing yet (the first boot with migrations takes a while) or the domain isn't assigned to the
paymentercontainer. Check Logs. http://links, broken CSS or failing uploads: trusted proxies are missing (step 9).- Invoices aren't generated: check
schedule:list, the timezone under Settings → General and the time under Settings → Cronjob. On a fresh install the panel says "Last cron run: Never" until the first scheduled time arrives; that's normal.
Part 6: do it with Claude
If you're not technical or this guide gets complicated, you don't have to do it all by hand. Claude can do the deployment with you: it drives the browser, explains each step in plain language and asks your permission before changing anything. It also helps if you get stuck on any of the Part 5 errors.
What to have open and connected
- The Claude desktop app with the Claude in Chrome extension connected. In the app's settings, the connected browsers section must show your Chrome.
- Signed in, in Chrome, to Coolify, your DNS provider (Cloudflare in our case) and, later, Paymenter. Claude doesn't type passwords: you sign in and it works in the tabs that are already open.
- This information at hand: your Coolify URL, the subdomain you want for Paymenter, the DNS panel URL and the VPS IP (the same as the
coolifyrecord).
What it won't do without asking
For safety, Claude asks you in the chat before changing DNS, deploying, touching the proxy or making any production change. It also doesn't type credentials or gateway keys. You run the php artisan commands yourself in Coolify's terminal when it tells you to, because they ask for personal details and a password.
Never paste passwords into the chat. If Claude needs to get into a site, sign in yourself in that browser.
The prompt
Adapt the data in brackets and paste it as is:
Deploy Paymenter on my Coolify at [https://coolify.yourdomain.com] using the official template, in a project called "billing", production environment.
Change the image to ghcr.io/paymenter/paymenter:v1.5.9 before the first deploy.
Set the domain [https://billing.yourdomain.com].
Check that the A record for [billing] points to my VPS IP. My DNS is in Cloudflare: [DNS panel URL]. If it's missing, ask me before creating it and create it as DNS only.
Deploy and wait until the containers are Running (healthy).
Then tell me which commands I should run in Coolify's terminal to initialise it.
Once it's at /admin, set the Trusted Proxies.
Don't type passwords and ask me before any change outside Coolify.
If something fails, ask it to check the service logs and tell you which Part 5 error it is before touching anything.
And if you'd rather have someone implement it for you, at the end of the article you'll find the agency we recommend for custom development.
Conclusion
With a VPS costing a few euros a month and an afternoon of work you get a complete billing system, with HTTPS, backups and controlled upgrades, and no per-customer licences. Coolify reduces the operational side to a few clicks, and Paymenter, being MIT-licensed, lets you adapt it to your business without asking anyone's permission.
Will you use it for a hosting business, licences or recurring services? The natural next step is configuring a payment gateway and your first product, covered in the Paymenter configuration guide for agencies.
// source code
// referenced stack
// implementation